
We live in an era when data is the most valuable source of information that any person or business has: it is from data that we make purchase decisions, changes in routine or, think from the companies’ point of view, evaluate profitability, performance and communication strategies, for example. Data has been so widely discussed that new laws, business practices and even billionaire movements in various markets are influenced by the protection, exchange, and leakage of sensitive information – and this is causing changes in the way business owners see the measurement and analysis of data from their companies – and that’s also why is so important to keep track of time and costs in every single project.
With that in mind, Nutcache has developed a project management approach that allows you to generate, monitor and store very important information for your company’s reports and the projects it carries out – from the analysis of employee attendance for the Human Resources department to expenses and profits from a delivered project. This real-time monitoring is essential so that C-Levels or project managers are always aware of the progress of the demands and especially if they are being carried out according to pre-established scripts, budgets and plans, which means your business can know the profitability of a project throughout its life cycle.
Let’s look at the 5 steps for using Nutcache to track project time and costs
Step 1: Create a project and set your guidelines
As soon as you select a plan and start using Nutcache, your organization can be configured in our software, and you have the possibility to perform this step in a very complete way, with important information for both HR – with documents and information of each employee – and the financial department – with defined workloads and cost per hour, for example. In addition, you can define the security profiles of each team member (interns, employees, freelancers, etc.) and the access levels that each category has within the project’s planning. You can also invite customers to your projects, describe the services your business offers, list all the important holidays for your business, as well as products, taxes and assemble teams from the general staff.

Once the organization configuration step is completed – even if this step is constantly updated -, you can create different projects in the software, according to your day-to-day needs and the work that will be performed by your company. To create a project, you will need to define a name, the client for which this project is intended and the members who will be part of it.

You can also select one of the six templates available to help optimize time for your project’s visual organization:

From there, the next steps are to set the status (if your project is still in the research and planning phase, or execution itself, for example), and you also have the freedom of writing a description so that everyone is on the same page, as well as the vision that the project aims to achieve.

The second tab is the Project Dates tab, which is self-explanatory – just add the planned start and end of the project and you’re good to go to the final step!

Finally, you have six keys to configure project execution:
1) Enable or disable project invoicing
2) Set whether invoicing is restricted to approved time and expense entries only
3) Limit or not the time entries so as not to exceed what was pre-established for the project
4) Define whether budgets will be restricted to approved hours and expenses or not
5) Stop regular members from changing the status of tasks marked as “Done”
6) Stop regular members from changing estimated times on tasks and projects

Step 2: Instruct your team to track all time spent on tasks
Now that your organization, team, and project are all set up, it’s time to get to work, and the most important part of this step is to make sure all collaborators know their roles in the project delivery. As we’ve said before, monitoring the time spent on different tasks is essential for a budget and invoicing that is in line with what was planned and defined from the beginning. If your project or your client is billed without a limit of hours worked, great, but we know that the most common model is billing based on a specific scope of work with a pre-established volume of hours, which is why your team needs to adopt the habit of marking any and all hours spent on tasks.
This can be done in two different ways with Nutcache:
1) Hours can be manually added from the time entry screen.

2) The time can also be logged via timer directly on the task, meaning when an employee begins his task, he starts a timer and stops it when he is through.
![]()
By adopting this routine for all members of the designated team, the project manager will be able to monitor the project progress in real-time, in addition to keeping the projects within the defined plan by the client, avoiding wasted hours and unnecessary expenses. Another great benefit is that your finance department will have a detailed report of all the time and costs spent on each stage of the tasks in a project, which allows for increasingly accurate monitoring and planning, avoiding some (bad) surprises at the end of the job.
Step 3: Detail the expenses involved in the project
We at Nutcache know from our client experiences that some projects begin with all pre-approved expenses, but it is also highly likely that new expenses will occur during the project’s execution. With this in mind, we introduced a field to each project task for you or your team to enter any additional charges that may occur during the project’s execution and must be paid at the end – either by the client or by your own firm.

As shown in the image above, you can add the expense number, date, and due date, in addition to defining the supplier and the expense category. Finally, there is a section to better explain the expense, as well as a field to define the amount of the expense and, if necessary, tax definitions. These are powerful tools to help your company keep track of time and costs in along the execution to avoid (bad) surprises.
It is important to remember that both expenses and hours spent on project tasks can be configured for later approval by someone responsible on the team, as we will see in the next step.
Step 4: Approve employee time and expenses
One of the most significant aspects of the project’s assertiveness is that it does not deviate from the scope that was initially agreed upon, either in terms of working hours or budget, or both. With that in mind, we’ve already covered in step 1 of the project invoicing configuration keys, which provide the manager or responsible person the authority to approve or disapprove both time entries and extra charges incurred during the course of the work, making it easier to keep track of time and costs.
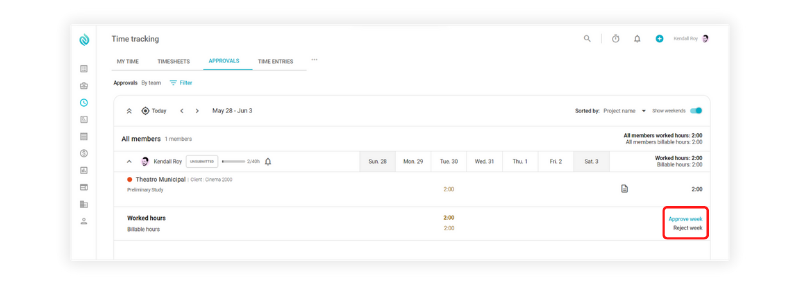
Throughout the project, the project manager or finance department can keep track of time records as well as the amounts spent on necessary execution expenses, determining what will be charged to the customer and what will be absorbed by your organization at the end of the project.
Step 5: Track stats in real-time, generate reports, and analyze the work done
Once you’ve done all of the above steps, tracking, reporting, and analyzing the work performed by your team will be much easier. The service team will have several important pieces of information to carry out the necessary exchanges with the client and the financial team will have a breakdown of hours worked and extra expenses of the project.
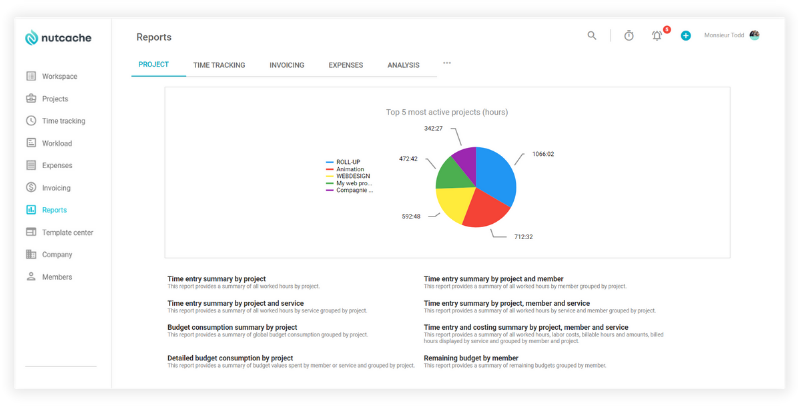
In addition, as we said at the beginning, your company will have access to several important pieces of data to optimize new contracts and better targeting in the future. You’ll be able to see which stages of a project took longer or shorter to budget, what types of extra costs wind up appearing in the scope of work permitted by the customer, and the professional levels required to meet each of the requirements – interns, juniors, full-timers, senior or freelancers. Data will be your greatest ally to generate projects that are increasingly complete, assertive, profitable, and that burden less and less your own business.
Conclusion
Now we know that the more data your company has to benefit your business, the better, and with Nutcache, you can keep track of the time and costs of all the projects you execute, and from that generate complete reports with data that will help your organization to close new deals with increasing value for the growth and development of your organization.This also helps to keep work in line with the initial planning, offering detailed tracking of expenses throughout the process and generating constant insights into the productivity and profitability of projects executed by your company.
Visit our pricing page to find the best plan that fits your needs, join Nutcache and follow the steps above to have greater control and productivity over your work.


